Showing posts with label being crafty. Show all posts

Wednesday, August 22, 2012

DIY: DREAMCATCHER JEWELRY DISPLAY.

I love that its practically a given in design these days that items such as shoes, favorite garments, and jewelry are made a part of the decor and not just stowed away in drawers and closets. I have quite an extensive costume jewelry collection and it was about time I made a home for some of my favorite earrings.

What I did: you need 1 extra large embroidery hoop, spray paint, twine, and pretty jewelry to display. The mister was kind enough to spray paint my hoop for me- just separate the hoops and evenly coat the whole thing. Let dry. Tie one end of your twine to the inner hoop and begin wrapping it around- be taught with the string but not so tight you warp the flexible wood. Tie the other end to the hoop when you have created enough twine space for your baubles. Place the larger outer hoop around the inner hoop and tighten. Hang and decorate!

Easy as pie and easy on the eyes!

Happy DIYing!
xo-
Janae

Friday, May 11, 2012

DIY: GEOMETRIC PRINT BACK PACK.

Printed back packs are super popular this summer and vary in price from $15 and up- this bag cost me $11.99 and is completely unique to my taste.
Supplies needed: Canvas bag - I found mine at hobby lobby, Craft Foam, Acrylic or Fabric paint, brushes, scissors, Sharpie.

Get Started: Draw your geometric shape on your craft foam, I chose a triangle for mine. Cut out as many of the shape as you want in variety of color- I used a total of 5 colors so I had 5 triangles.
 Plan ahead! Piece your shapes together as you go to get a great composition.

Work your way around the bag, I had to fill in my stamped shapes with more paint as I went a long to get a nice solid shape.
And there you have your very own, customized printed backpack! Add personal touches like key chains or some embroidery to make it all yours.

Happy Crafting!
Xo-
Janae

DIY: PAINTED LEATHER CUFF.

Custom and personalized accessories are so much fun! I love being able to say that no one has exactly what I do. This is a quick and easy afternoon project. Supplies Needed: Leather or Faux Leather cuff from the Craft store, Acrylic Paint, brushes, pencil
Step One: Gently press your pattern into the leather- I used a pencil because it left an impression without leaving an actual mark.
Step Two: Paint your design. I used regular craft store acrylic paint, and I noticed that it seemed to dry a bit faster on the leather than it would on paper- so make sure you work fast!

Step Three: Let Dry
Step Four: Enjoy your new bracelets!

Xo-
Janae

Tuesday, May 8, 2012

PAPER FLOWER.

I came up with the idea for the Paper Flower from a magazine photo quite awhile ago- it was a piece of art wayyy back in the back of the photo, just an addition to a bookcase but I loved it! I have a stash of stained wooden plaques lying around (remnants of a project that died before it even lived, so sad) so with cardstock, a sharpie, scissors, and multi-purpose glue I set out to make my own variation.

How I did it: I started by 'hashing' lines on the cardstock to create a texture, you could use scrapbook paper, news print, or plain. I then cut out circles and folded them into quads. I cut deep curves into the folded paper so when you opened it up it became more of a clover shape. I then glued them on at different angles and let dry. After they were completely dry I pulled the edges up ever so slightly to not lose the three dimensional look.

And there you have it.
Happy Crafting!
Xo-
Janae

Sunday, May 6, 2012

DIY: FLORAL HEADBAND.

I love all of the DIY floral crowns that are to be found out there on the interwebs and this simple headband is just a spin off of those. I think twine is oh so pretty and romantic, add some flowers and you have yourself a lovely accessory to carry you through the spring ... hello May!
 Supplies needed: Silk flowers, twine, needle and thread, scissors.
Step by step: 1. cut three strands of twine (mine were 36 inches long, measure around your head and leave extra) and cut off a handful of silk blossoms. 2. knot your twine together at one end leaving about two inches for tying. 3. Begin braiding! 4. Once you have gotten to the end, knot again, and leave another 2 inches for tying off.
 Sew your blossoms on!
and then enjoy your pretty twine and blossom headband- so pretty and simple! If you aren't great with a needle and thread I think you could use hot glue on this craft just as easily!

Happy crafting!
xo-
Janae

Thursday, April 26, 2012

DIY: PEARL EMBELLISHED SHORTS.

Have a pair of shorts that could use a new lease on life? This is a simple and inexpensive way to change up the look of your denim- all you need is: pearl beads, needle, thread, and scissors.
Step one: arrange your pearls to see how many you want to sew on. Play around a bit and see if you prefer more or less- I ended up going with less for a more subtle look. Then, one by one sew each one on.
 And there you have it. I am looking forward to pairing them with flowy tanks and platforms when it gets warmer!

Happy Sewing!
Xo-
Janae

Tuesday, April 24, 2012

DIY: DINO DECOR.

Here is a fun and easy way to decorate your space with an inexpensive spin on a childs toy! The mister loves dinosaurs and I am always trying to integrate our two different tastes in our home- so when I was looking for a fresh idea for a centerpiece I turned to these little guys at the dollar store.
What you will need: Dinosaurs (or any plastic animal) acrylic paint, brushes, high gloss glaze medium, cake pedestal.
Paint your dino's whatever color you desire and let dry. Ours took about 4 coats of paint. Allow to completely dry and then apply your gloss glaze. This will give your dino a nice polished look and help keep the paint from chipping. Once complete, I arranged mine on a cake pedestal in the center of our table... I love the way they turned out!
I am hoping to find at least one large on to add to the bunch!

Happy painting!
Xo-
Janae

Sunday, April 22, 2012

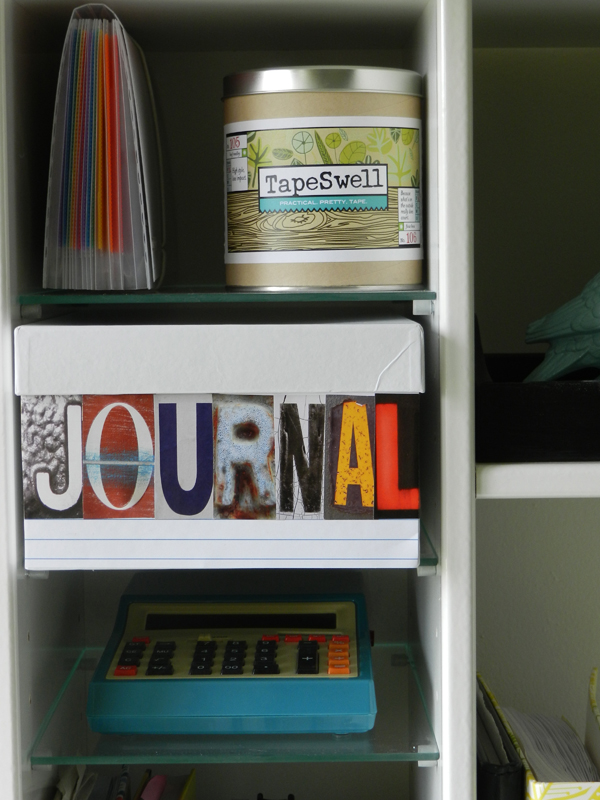
DIY: JOURNAL BOX.

I am always looking for ways to be more organized. And if I can get the job done and make it completely personal all the better! I found this plain white box in the kiddie craft aisle at Target- its about the size of a shoe box and was the perfect fit for all of my notebooks that I don't need to carry in my bag.
 All I did was used rubber cement, scrapbook paper, and letter stickers. I chose a notebook print paper, cut it to fit the front side of the box and adhered it with the rubber cement. I then put my stickers done and tucked it in its cubby. It seriously took all of 10 minutes to make this little odds and ends hide-away!

Happy organizing!
Xo-
Janae

Wednesday, April 11, 2012

DIY: NOTEBOOK POUCH.

I carry a lot of notebooks with me in my purse on a daily basis- my idea journal, my art journal, and my to-do list journal. With all the journals and pens floating around I was really wanting a carry-all case for them and couldn't find anything on the market that I liked. So I decided to make one! I constructed mine out of some upholstery fabric I had left over from another project since it was more sturdy for the wear and tear I anticipate for it.

Supplies you will need: Fabric, scissors, thread, needle, embroidery thread, and a button. I cut my fabric at 12.5 inches x 11 inches. I used my largest notebook as a size guide. Sew into a pouch with the fabric inside out so the raw edges are hidden and hem the top. Make a closure flap with a 4 inch x 2 inch piece of fabric and use embroidery thread to hem and add a decorative touch. Cut a button hole and line up with your button. And there you have it!

Happy sewing!
Xo-
Janae

Monday, April 9, 2012

DIY: PAINT CHIP WALL HANGINGS.


The mister and I decided this weekend to make our second bedroom an official office for The Hers and His Shop and Blog. It took a lot of elbow grease and purging but we did it. And to help create a more inspiring place we branded the room and put up lots of things that inspire us. One of the things we did to office-fy our space was create these wall hangings in our colors. I love how they turned out, and paint chip inspired crafts and art is so chic right now ::winks::

Step One: Gather your supplies
Step Two: Tape off your canvas into thirds- you can be mathematical or eye ball it like I did.
Step Three: Choose your two colors, start with the original color at the top and then add white to lighten your color in each consecutive square.
Step Four: Allow to dry and then paint your numbers or make up fun names!
Step Five: Hang and enjoy!


Happy Decorating!
Xo-
Janae

Monday, April 2, 2012

A QUICK DIY.

I bought this clutch at Hobby Lobby on Saturday with no real plan in mind- but I ended up wanting to use it that night but wanted something fun. So, with some white paint, a paint brush, and 30 min I created a unique accessory for my night out!

Happy Crafting!

Xo-
Janae

Tuesday, March 27, 2012

DIY TOTE BAG.

 I am really loving making my own stamps right now! Its so fun to create your own unique design and colors. I made this stamp awhile ago using the method found here and here and finally used it this week. I decorated this simple canvas tote bag and a scarf for spring!
Happy Crafting!

Xo-
Janae

Tuesday, March 13, 2012

DIY: EASY INSTA-ALBUM.

 Lately I have been a Postal Pix ordering fool and now have oh so many loose pictures it was time to do something about it! This was a simple one night project and all you need is: a photo album (mine was 8x8) pretty paper, washi tape, rubber cement, and your favorite pictures! I picked up a black cloth covered album so I painted a design on the front. I did a simple layout and just alternated by page, adding washi tape for a special look. I have another album waiting for my Instax photos next!

Happy album making!
Xo-
Janae


Sunday, February 26, 2012

DIY: HEART PRINT CIRCLE SCARF.

Supplies you need: Fabric (I chose an interlock knit), Foam sheet, wooden block (optional), scissors, paint, brush, craft glue, and sharpie or pen. Step 1: Make your stamp- Elsie over at a Beautiful Mess has a great tutorial- I cut mine out of simple craft foam and mounted it with craft glue to a wooden block. Step 2: Lay your fabric out flat, iron if necessary. I used half a yard and randomly stamped my hearts all over it. I applied more paint with every application. Let fully dry. Step 3: Sew your scarf! I folded my fabric in half long ways with right side facing in. Then reverse it so it becomes right side out. I then sewed the two ends together with the same method so that the seam was hidden on the inside.

 she wore: Forever 21

And there you have a weekend craft!

Xo-
Janae